You are in a Zoom class, and you want to give a thumbs up but aren’t sure where to click. Or you have heard about being able to raise your hand in real life and have an emoji appear on screen, but when you try, it doesn’t work.
Or you hear terms like Zoom reactions, nonverbal feedback, and gesture recognition but have no idea what the difference is, and when you Google it, you find answers that are WAY too “tech-savvy.”
Trust me, I get it. I have done all of these things.
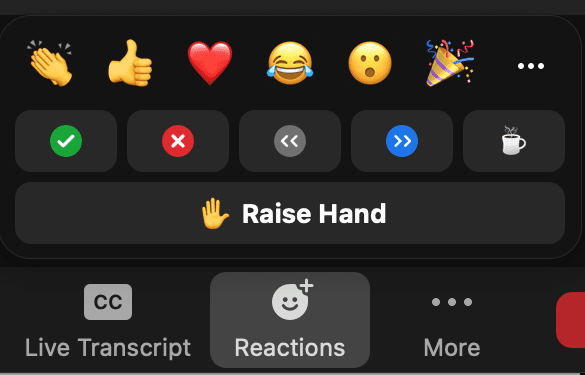
In Zoom, reactions are emojis, such as clapping and thumbs up. Nonverbal feedback are the emojis sent as a signal to the host, such as raised hand, yes, no, or slow down. With gesture recognition, users raise a hand or thumbs up to the camera, and a raised hand or thumbs up emoji appears.
Let’s further break down what is what, how to enable these features, and how to use them.
Want to look your best on Zoom? Good webcam lightingand a laptop stand
to keep your camera at eye level will help you look great!
Zoom reactions
All Zoom accounts allow users to send reactions (emojis) during a meeting to give feedback without interrupting the meeting.
To send a reaction, click the “reaction” button on the bottom toolbar:

There are many emojis available to use, including:
- Clapping
- Thumbs up
- Heart
- Smiley face emoji
- Crying laughing emoji
When you click on the three white dots:

You can see all the available emojis (pretty much all emojis):

Select which reaction you want, such as clap or thumbs up.
Using reactions on a phone or iPad
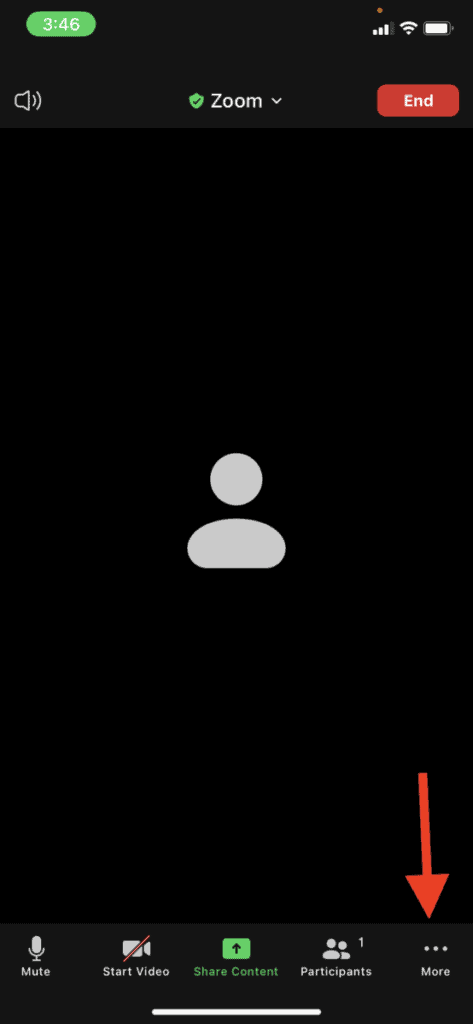
If you are using a phone or iPad, the “Reactions” button may be hidden, so you need to click the “More” button first:
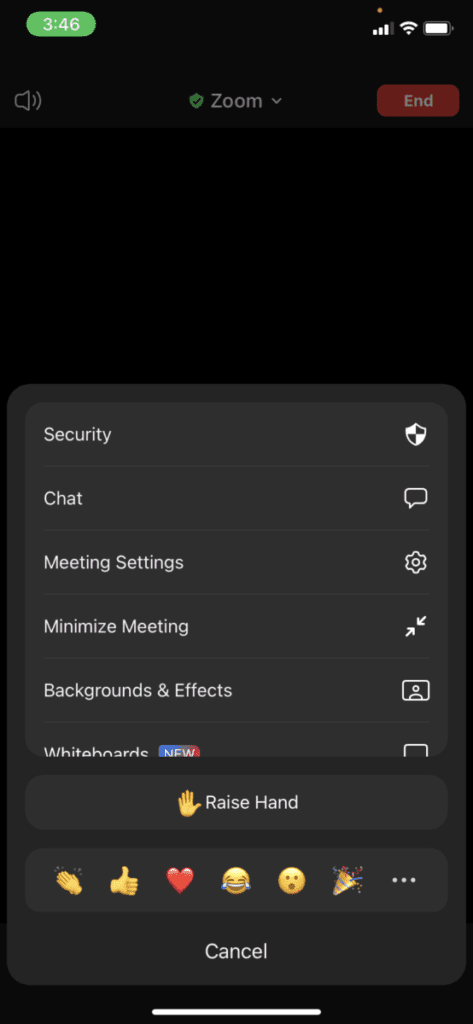
Then you will see the reactions there:
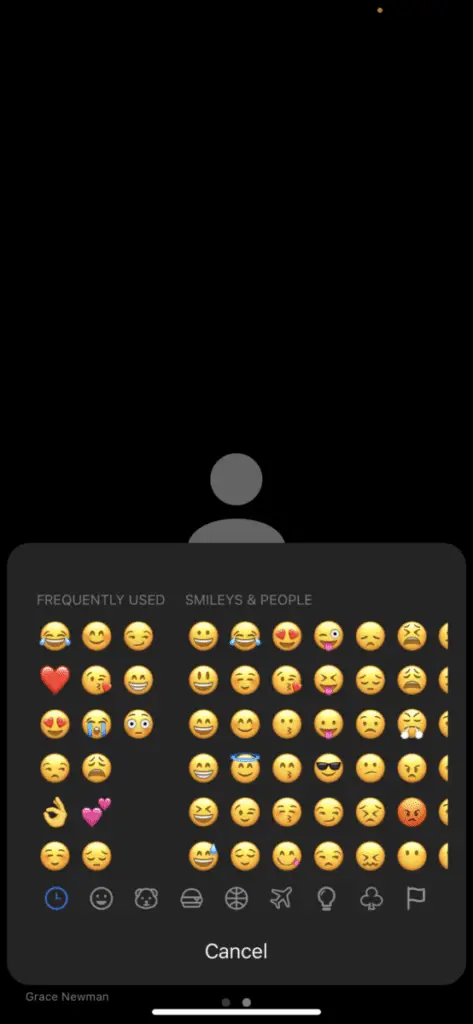
If you want to see all the emojis available, click the three white dots (just like on a laptop), and it will show them all:
Check out all the benefits of Prime Student. Click here
to sign up for Prime Student.
Zoom nonverbal feedback
Zoom allows all users to send nonverbal feedback to the host or presenter.
The nonverbal feedback is located under the reactions button, so first click the reaction button on the bottom toolbar:

Then you will see the nonverbal feedback options:
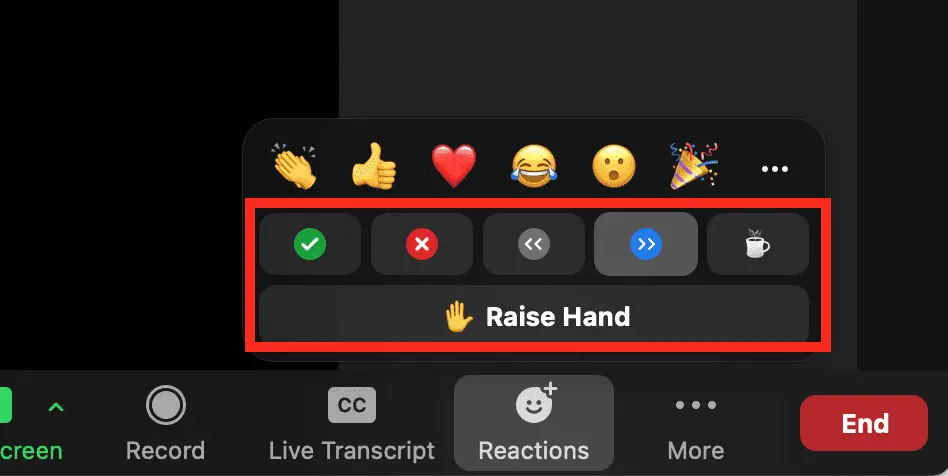
These buttons are:
- Yes: A green circle with a white checkmark
- No: A red circle with a white X in it
- Slow down: A grey circle with two white less than symbols
- Speed up: A blue circle with two white greater than symbols
- I’m away: A coffee cup
- Raise hand: An emoji of a raised hand
Zoom gesture recognition
Zoom gesture recognition means that people’s physical gestures will correspond to the same meeting emoji. If a user raises their hand in front of the camera, a raise hand emoji will appear. If a user gives a thumbs up to the camera, a thumbs up emoji will appear.
To use gesture recognition, you must first enable it (I walk you through how to do that below), and you must have your camera on.
Hold your hand up or gives a thumbs up in front of the camera, and a box with the corresponding emoji will appear. The circle in it will start to fill:

Keep your hand up/your thumb up until the circle is filled in (a few seconds), and then the emoji will appear by your picture.
Why is Zoom automatically raising my hand?
If Zoom is automatically raising your hand, it most likely means that you have triggered Zoom’s gesture recognition. The camera sees your hand, such as when you move your hands as you speak or raise your hand to touch your face or hair, and thinks you are trying to raise your hand.
Click the “Lower Hand” button. Going forward, try to keep your hands down at your sides, and if you see the raised hand circle starting to fill, lower your hand.
You can also disable gesture recognition on Zoom (I walk you through how to do so below).
Enabling/disabling Zoom reactions
You can enable or disable Zoom reactions by going to your account settings.
If you don’t have a Zoom account set up yet, check out our guide on Setting Up School Zoom Account .
.
Enabling/disabling nonverbal feedback and reactions
To enable reactions and nonverbal feedback, go to Zoom and click “Sign in”:

After you sign in, click on the “Setting” option on the left-hand side:

You will be on the “Meetings” tab.
To enable nonverbal feedback, scroll down until you see “Non-verbal feedback”:

Check it to enable it and uncheck it to disable it.
To enable reactions, scroll down until your see “Meeting reactions” (it is directly below non-verbal feedback):
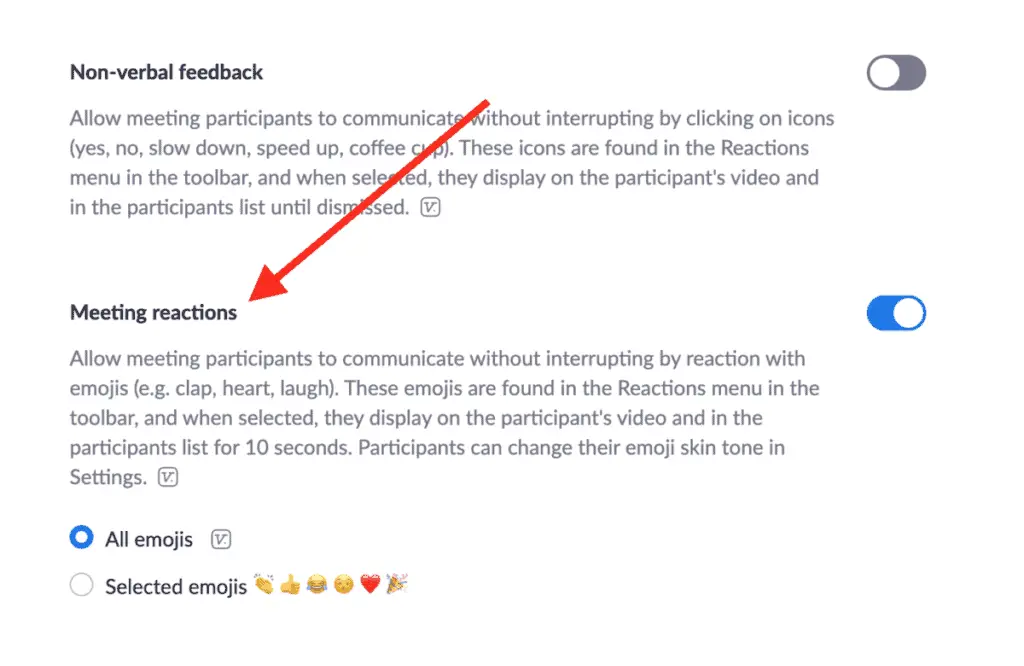
Check it to enable it and uncheck it to disable it.
Can the raise hand be disabled on Zoom?
While the raise hand emoji is part of the nonverbal feedback, the raised hand cannot be disabled. This means that participants will still be able to raise their hands even with the non-verbal feedback disabled.
Enabling/disabling gesture recognition
To enable gesture recognition, open the desktop app, then click on your picture in the top right-hand corner. Then click on “Settings” from the dropdown list:
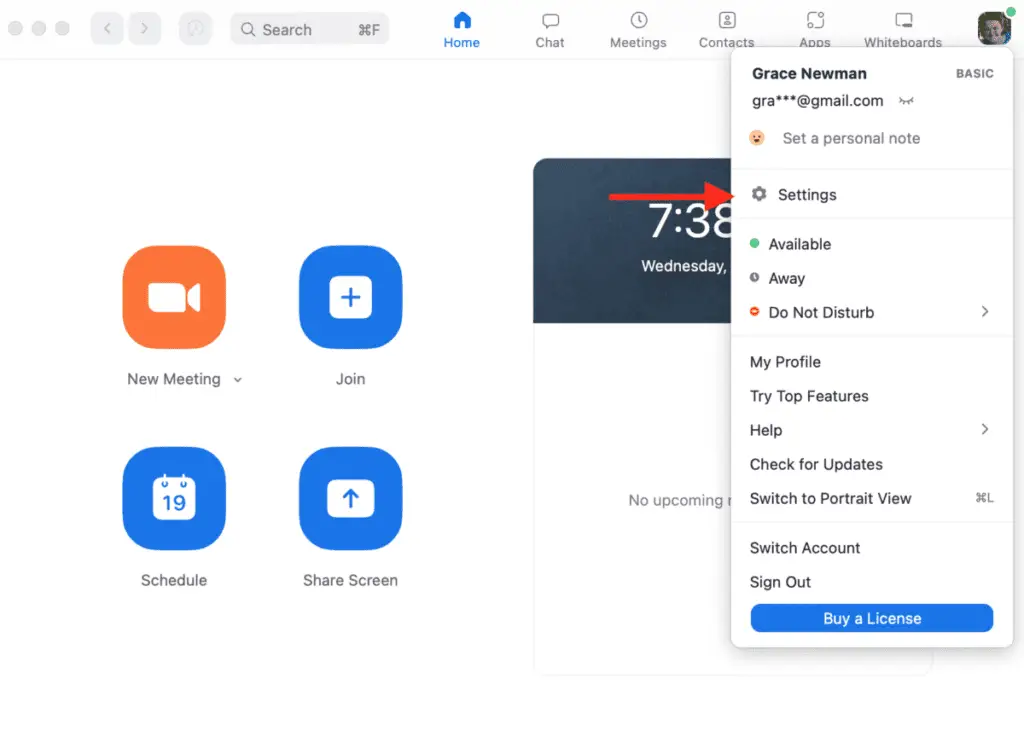
From there, check “Activate the following emojis based on hand gesture recognition:
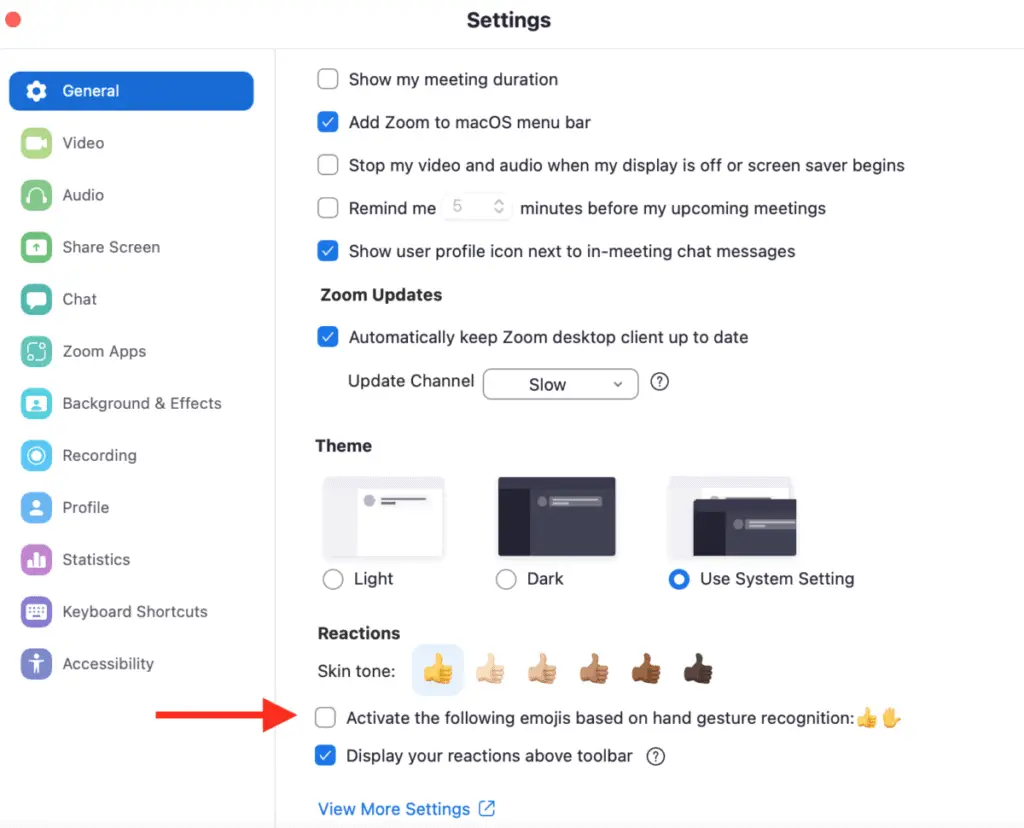
To disable it, uncheck that box.
I would recommend disabling gesture recognition since it is not difficult to click the button, and it can be annoying if you talk with your hands a lot or mess with your hair, and you don’t want Zoom to recognize this as raising your hand.
How many emojis can you use?
Users can only send one reaction and one nonverbal feedback at a time:

If you send a heart and then try to send a thumbs up, the heart will disappear, and the thumbs up will replace it.
The same is true for nonverbal feedback. If you send a Yes and then raise your hand, the Yes will disappear, and the raise hand emoji will replace it.
Where do the emojis appear?
Everyone can see the emojis. All emojis appear beside the user’s name in the participants’ menu:
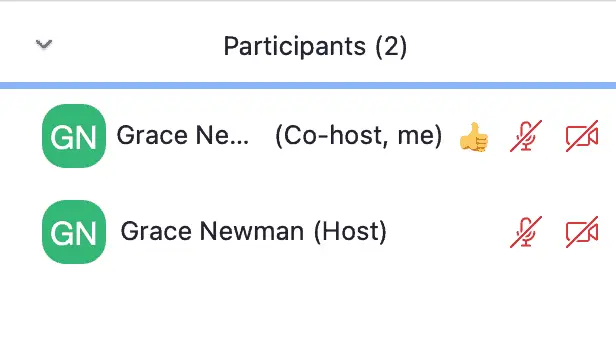
They also appear in that user’s video box on the top left-hand side:

Hosts can also see how many participants are sending each nonverbal feedback emoji at the bottom left-hand side of the participants’ menu:
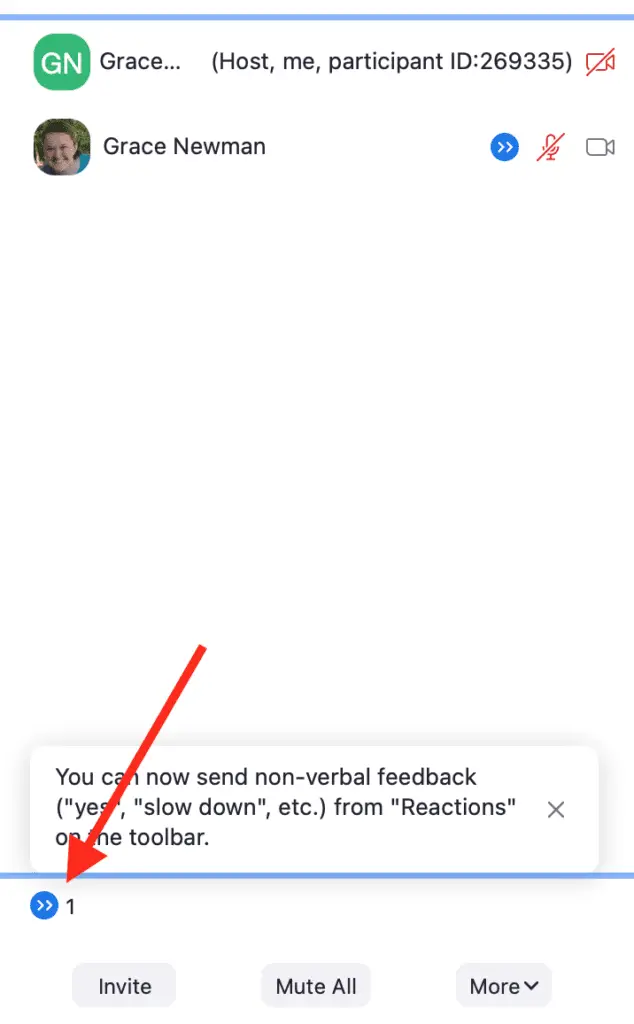
How do I change the skin tone of emojis on Zoom?
There are two ways to change the skin tone of emojis on Zoom.
To change the skin of emojis during a meeting, click on Reactions and then click on the three white dots:

Underneath all the emoji options, on the bottom right-hand side, click “Skin tone”:
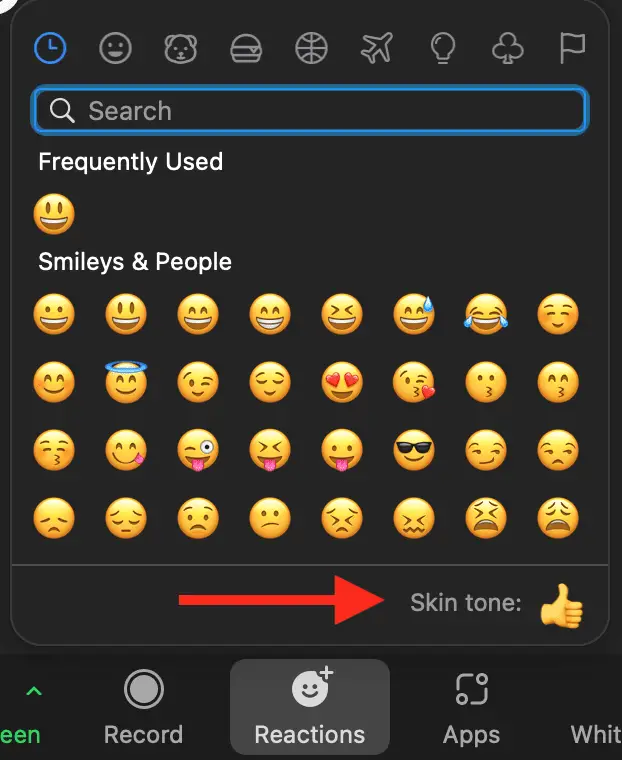
There you will see the different skin tone options, and you can pick one:
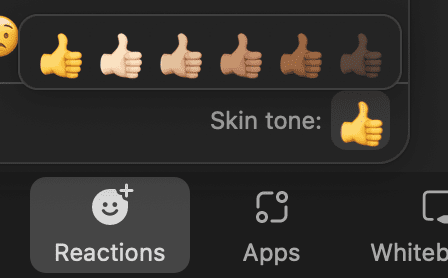
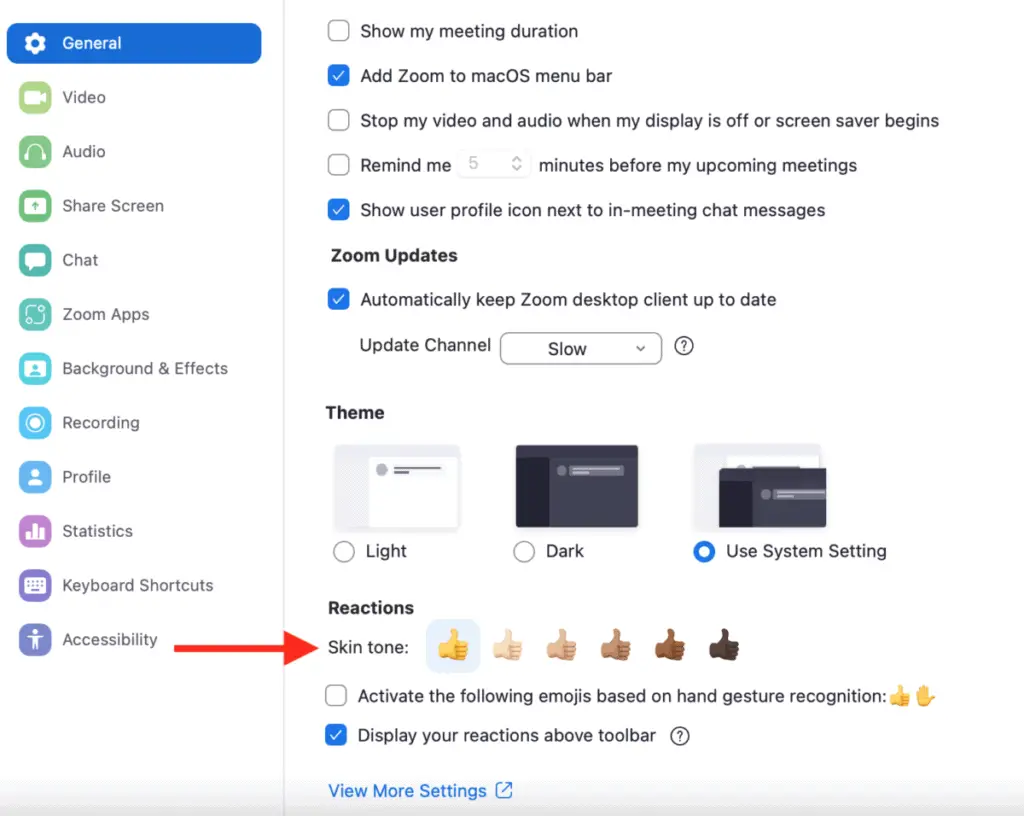
You can also change the emoji default from Yellow by going to settings on the Zoom app:

Under general, go to the bottom where it shows the Skin tone options. Pick which one you want to be your default.
How long do emojis on Zoom appear?
According to Zoom, the Emoji reactions stay on the screen for 10 seconds, then they disappear. The nonverbal feedback (yes, no, slow down, speed up, I’m away, and raise hand) stay on screen until the user or the host remove them.
How long do the reactions stay on screen?
The emoji reactions on Zoom stay on the screen for 10 seconds.
How to lower hand and remove other nonverbal feedback in Zoom
To lower hand, you click “Lower hand,” or you click the raise hand button again. To remove other nonverbal feedback emojis, you click the same button again.
How long do the gesture recognition symbols stay on screen?
The thumbs up emoji will stay for 10 seconds and then disappear, but you will need to click the lower hand button for your raised hand:

Now that you know how to use Zoom reactions and nonverbal feedback, use them! Engaging in class and providing your professor feedback can make the class more interesting and help you pay attention in class .
.
For more tech tips, check out our post: Why Can’t I See Myself in My Zoom Meeting?: 8 Fixes! and our guide on The Basics of How to Use Zoom
 .
.
My favorite products for Zoom meetings and classes
Thank you for reading this article—I hope you found it helpful! Here are some of the best products I have found to help make Zoom meetings and classes go smoothly.
Noise-canceling headphones: All students and anyone attending a lot of Zoom meetings need to invest in a good pair of noise-canceling headphones. I have used Bose earphones for over a decade, and I love them! I practically live in my earphones and have tried many different brands. Bose is by far the best brand at actually blocking out noise.
Laptop stand: One of the best ways to look good on video calls is to have the camera at eye level. A laptop stand is an easy and affordable way to do this.
Webcam: If you have a good laptop with a functioning webcam, then you don’t need to buy an additional webcam, but if your laptop webcam is poor quality, you may need to buy a webcam
 .
.
Webcam lighting: Another way to look good on video calls is to have good lighting. A great way to achieve this is with lighting that attaches to your computer . This will also ensure that you can be seen no matter where you attend are when you attend the Zoom meeting.
To see all of my most up-to-date recommendations for tools and products for students, check out this resource that I made for you!


