
I was a little intimidated when my school told me I had to take my student ID photo at home and send it to my college to get a student ID card.
Luckily, it was not hard.
To take your student ID photo, you need to look up your school’s photo ID requirements, have a white background, and have plenty of light. Stand a few feet from your background and have someone take a picture of you with the camera at eye level. Crop and resize the photo to your school’s requirements.
Let’s look at what you can do before, during, and after you take your student ID photo at home to get the best picture.
Check out my favorite way to carry your student ID: small card slots that stick on the back of your phone that are leatheror silicone
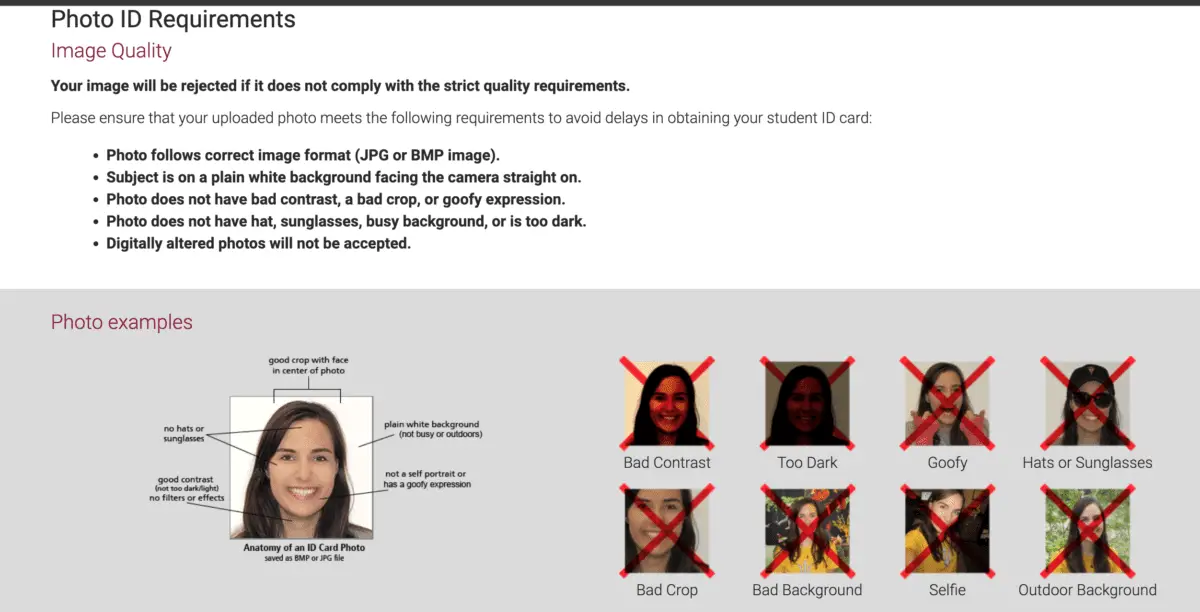
Student ID photo requirements
While the requirements for your student ID can be slightly different depending on your school, here are the most common student ID photo requirements:
- Colored photograph (cannot be black and white)
- Recent, no more than 6 months old
- Plain white background
- Well-lit. No shadows or glares.
- Shoulders and entire face must be in the center of the picture
- Facing straight forward (not titling head or body)
- Not blinking
- No other people or objects in the photo
- No hats or sunglasses
- No filters or edits
- Meets your school’s photo size requirement (often 600 x 600 px)
- Meets your school’s maximum file size requirement
- Meets your school’s file type (such as JPG, PNG, or JPEG)
The most important thing you can do is to check your school’s requirements for the student ID photo!
Check out all the benefits of Prime Student
Before: Prepare for your photo
Preparing to take your student ID photo is the most important part of trying to have a good ID photo. Here are some tips to help you prepare.
Get plenty of sleep
The best thing you can do to look good in your photo ID is to be well rested.
What to wear for student ID picture
Students should wear a flattering top that covers their shoulders, have their hair down but out of their face, and do their makeup how they normally do. They should not wear sunglasses or headwear.
Clothes
Wear a flattering top that you like. Keep it simple. Nothing that will make you cringe when you look back on the picture.
As long as it is nothing obscene, the school doesn’t care what you wear, but there are some things to avoid if you want to look your best:
- Don’t wear white since your background is white
- Don’t wear clothes that match your skin tone since they can wash you out
- Don’t wear sleeveless shirts since only your shoulders will be in the photo. You want to make sure you can see your shirt.
- Don’t wear jewelry that will cause a glare.
Hair
Wear your hair in a natural way that you already know looks nice. Since you can’t see the back of your head and you’re straightforward in your picture, I recommend wearing your hair down with it hanging over both shoulders.
I wore my hair in a ponytail in one of my student ID photos, and I hate it. It looks like I have super short hair (not a good look on me).
Make sure your hair isn’t covering your face.
Your full face and eyes must be visible. If your hair gets in your face a lot, pull it back or use bobby pins to keep your bangs out of your face.
This keeps your face visible and helps prevent shadows from loose hairs.
Makeup
You want to look like your normal self. Do your makeup the way that you normally would.
However, skip anything that makes your face shinier (moisturizers, sunscreen, foundation, etc…) since it tends to reflect light.
Glasses
School IDs are less formal than passport photos, so you can wear your glasses if you want to. However, make sure that your pupils are visible and there is no glare or reflection. Slightly tilting your head down can help minimize any glare.
It may be easier just to take your glasses off.
Sunglasses are not allowed.
Hats or headwear
Do not wear any hats or headwear unless it is for a religious or medical reason. If you need to wear headwear, make sure your face is still visible.
Background
Find a plain white background for you to stand in front.
If you don’t have any white walls, you can use a sheet or poster board.
Make sure there are no other people, pets, or objects behind you.
Lighting
The picture needs to be well-lit (not too light or dark) and without shadows or glares.
If possible, use natural light. Have your face pointing toward the light, but avoid direct sunlight (be a few feet away from the light) since this can cause shadows.
If you can’t use natural light, you can use a ring light.
During: Take your photo
While taking your student ID photo at home, make sure you have the camera at eye level, stand a few feet in front of the background, look straight at the camera, and smile.
Camera position
The picture can’t be too zoomed in or out, from above, below, or from the side.
Position the camera at the height as your head.
Your face and shoulders must be visible in the center of the picture
It is recommended to take the photo from a little farther back with more of your torso and background visible and then crop the photo into the square or rectangle size required.
Posture
You need to stand up straight and look straight at the camera. Do not tilt your head.
Be in a natural position (no silly poses or duck faces).
Stand at least 1-3 feet in front of the backdrop to help you avoid shadows.
Smile

Since you are not supposed to smile in passport photos, some people ask, “Can you smile in student ID photos?”
Students can smile in student ID photos. Not only is smiling allowed, but it is a good idea to smile to make your photo look better and give a good impression to everyone that sees it.
Try to smile naturally. Don’t overthink it. A benefit of taking your student ID photo at home is that you can always retake it if you don’t like it.
Relax
This is a lot of information, but that is so that you can be prepared, not to overwhelm you.
If you are nervous about taking your student ID photo, remember that it is just a student ID photo– nothing to worry about.
Relax and smile.
Check the photo
The benefit of taking your student ID photo at home is that you can check that you like the photo. If you don’t, then retake it.
Make sure that you don’t have red eye.
After: Edit your photo
ID photos cannot have any digital manipulation (this means no filters or editing). Students can crop the photo into a square or rectangle, resize the photo, or compress the file.
Student ID card photo size
The size and shape requirements of a student ID will depend on the school. Some schools require the photo to be square, and the same size as a passport photo, 2 x 2 inches (51 x 51 mm) which is 600 x 600 px, but the other colleges want the photo to be smaller or rectangular.
There can also be a file size limit, ranging from 50 kilobytes to 3 MB.
Other colleges (like ASU) do not specify a photo or file size.
Check your school’s requirement list to see what size they require for the photo and the file size limit.
Crop the photo
You can crop the photo using your photos app on your phone. Additionally, most school websites allow you to crop the photo when you upload it.
Resize photo
Once you find your school’s photo size requirement, you may need to resize your photo to meet the requirement.
You can resize photos with:
- Picresize.com (this is what I use and recommend. It is free and super easy to use).
- Photo editing software such as Photoshop or Gimp
- Apps on your phone, such as Image Size
Compress the file
If your file size is above the maximum size requirement, you can compress the file using Tinypng.com.
How to take an ID picture with a phone
Anyone can take ID pictures with their smartphone or tablet by using the default camera app. Use the portrait mode to set the timer.
Follow the tips above for the best ID picture.
Can ID photos be selfies?
In general, ID photos should not be selfies. Taking a photo for an ID from an arm’s length away will lead to incorrect proportions. It is not enough distance to show your whole face and shoulders and the blank background space.
However, you can take your ID photo yourself if you use a selfie stick or a tripod.
It will probably be easier just to ask a family member or friend to take the photo.
Taking your ID photo is one of the requirements to get your student ID, click here to learn about the other rest.
My favorite products for student IDs
Thank you for reading this article—I hope you found it helpful! Here are some of my favorite products for taking student ID photos and carrying student IDs that I hope you’ll also find helpful.
Ring light for taking student ID photos: Use a ring light to have your photo well-lit and help make you look good.
Card slots: I think the easiest way to carry your student ID is using card slots that are leather or silicone. They stick on the back of your phone so you will always have it with you and won’t lose it.
To see all of my most up-to-date recommendations for tools and products for students, check out this resource that I made for you!